Sunday, January 8, 2012

Never Done This Before

Something I have learned while watching other people repair and construct this past year.  At lot of times, I find the experts saying "I have never done this before."

At first I thought they were kidding but now I know that houses are just different enough that it must be true.

Recently, I went to Memaw's house and found water in the basement.  Being the driest basement in the world I knew the record year of rain was not to blame but the plumbing.  So we called Root Klean and they cleared the main drain.

Being a good plumber, they told me that they previous plumber left a mess that needed to be cleaned up. I needed a cleanout installed properly.  They told me how much it was going to cost and I of course asked if there was any way to do it cheaper.  Charlie with Root Klean drew me a picture, met me at Lowes to get the right parts, loaned me a tools and provided that one part that nobody carried on the weekend.

In about three hours I took old copper and clay and installed a new PVC cleanout to make things easier in the future.

Before and after pictures follow.


Basement Almost Finished

So there is always a project that happens exactly like you thought it would and takes exactly the amount of time you planned.  The materials purchased are exactly what you need and the right amount.  It turns out as you dreamed and even a little bit better.  The following is not that project.

We knew when we bought this house that we had to do some repair to the basement walls.  I blogged a little about this project before as I waterproofed the walls.  We are finally coming to a close on the basement project.

It all started with some wet walls, then we tore those walls out.  We tore down another wall, then we put drywall back in place of the stuff we tore out.  I mudded that drywall, sanded, mudded some more, sanded, mudded some more and tried to make it perfect.

Kendal painted and painted then Sean Askren came and did the trim work.  Next we get carpet.  Here are some before and after pictures.  Carpet pictures come later.


Saturday, September 24, 2011

NO HOT WATER!!

One thing my wife definitely got from her mother was the need to shower in boiling water.  She uses shampoo, conditioner and soap but feels the need to burn off 1 of her 3 layers of skin in her morning shower.  Sometimes it is unbearable to be in the bathroom as the hot water steals what oxygen is available.

Needless to say, I have known that hot water is important to my wife and apparently to her mother also...apples don't fall from trees or something..i guess.  So we have made adjustments, she gets out of bed first and showers to ensure that the hot water is hottest for her.  I will admit, It is also nice that I get an extra bit of time in bed.

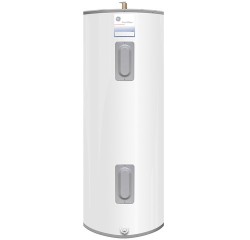
So the last 6 days in our new house haven't been necessarily the best for her.  She woke me up at least 3 or 4 times this past week and told me that she ran out of hot water.  This starts her day off bad and we just cannot have this.  So something must be done and it had to be done quick!!

We knew that she had hot water in the beginning of the shower, it went away during and she left the bathroom shivering.  When I went down I found the circuit breaker tripped.  This happened every time we did not have hot water.  That is as far as my troubleshooting skills were initially.

General Electric SE50M12TAH Water Heater
So I went to Google determined to learn to be a water heater repairman.  I found a website that taught me how to troubleshoot a water heater to determine possible faulty parts. Tanklets Website  I would have like some more pictures but this was the best website I could find with step by step instructions.

Fortunately I had the tool to do the troubleshooting after convincing my wife it would be useful a couple of years ago when our dryer was accused of being bad by an apartment complex with a clogged dryer vent.

So I started troubleshooting, I was a little nervous considering I had a couple shocks changing our outlets (120V) and the water heater has twice as much at 240V.  So I didn't dare even give this electric a dirty look for fear of death.

Step 1: Checked to make sure I had the right size breaker - CHECK

Figure 1
Step 2: Checked the screws above and below the high limit (red circle in Figure 1).  I did this by setting my multimeter to 300 on the ACV setting and touched the black stick to the screw with the black wire and the red stick to the screw with the red wire and it showed 240 V. ( I could have touched black to red and it would have been fine).  This test proved the high limit was pushing power through it and was okay. CHECK

Step 3: Turned the heat setting knob all the way over to the highest temperature setting and heard the thermostat click on.  I checked the screws and found 240 V on the thermostat screws. CHECK

Step 4.  Checked the element screws the same way (yellow circle). CHECK

Step 5. I repeated this for the lower thermostat and element (no high limit on lower panel).  The upper thermostat had to be off for the bottom element to get 240V (I turned the temperature down to lowest until I heard it click off.  There was 120 V as the troubleshooting website suggested prior to switching off the upper thermostat, afterward there was 240V. CHECK
Multimeter

Step 6. Turned off circuit breaker.  Removed one screw from the element to check for continuity.  I switched to the Ohm setting time 1k on my multimeter.  I touched the two screws on both elements and the needle moved all the way over.  This proved the elements were okay. CHECK

Step 7: I touched one pole to a screw and the other to the metal flange of the element (the flange is the metal behind the plastic box holding the screws that butts up against the wall of the water heater).  All four screws showed continuity which suggested that both elements were grounded out, I found this unlikely.  I talked to my supervisor, he said to remove both wires. When I did this, I found the bottom element was indeed grounded out and the upper was not. The fact that the wire was still attached made the upper act as if it was grounded out. CHECK

So I had done it!! I think I had figured out was wrong with my water heater.

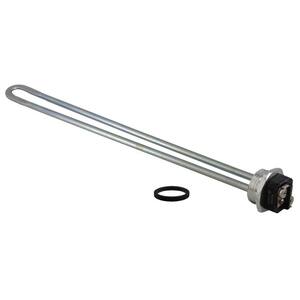
I went back to the computer and found the replacement element on the Home Depot website Rheem Water Heater Element.  So off to Home Depot we went..We bought the necessary element (right) and tool to remove the element (left).

I got home and started the draining of the water heater, opening the pressure relief valve on top of the water heater helps it drain faster.  After a long wait and some impatience on my part there was water on the floor and I was ready to start removing the old element.  It broke loose with a quick turn but I could not get it out.  I pulled and twisted and bent and it finally came out and boy did it need replaced (see below).

After I got this one out, I removed the top element to make sure it looked ok.  It looked a lot better than the one below.  I replaced the bad element with the new one.  Turned the water back on and kept the relief valve open, when the water came out I knew the water heater was full.  I put everything back together and turned the electric back on.  I completed this at 9:30pm and as of 10:30am today the breaker hasn't tripped and that is with two showers on it.

I just hope I fixed it but I am optimistic!!


Monday, September 12, 2011

Tile tile tile.....

Well the tile is down!! The laundry room, hall and foyer have been tiled. Thanks to Kendal and Kenny for their help!!


Laundry Before
 

Laundry after


Foyer
 

Monday, August 29, 2011

Hi Drylok

After work today, we submitted our 30 day notice to the apartment complex and they said they think they may already have it rented when we move out.  That is good news!!

We headed straight to the house and started the painting.  Kendal started in the bedroom, and I started in the basement.

I took some pictures of the progress we had made up to today.  Fancy Dryer Vent installed, kitchen painted, and basement ready for Drylok.

Keeps the critters out!
With the help of Becky, Bev and Larry the kitchen was painted a light green:


We were able to completely cover the exposed basement walls tonight by
hand brushing Drylok onto the walls. 


If you ever apply Drylok to the walls be sure the area is
very well ventilated and you are wearing a respirator.
IT IS VERY POTENT!!

Tomorrow: Coat two of Drylok

Sunday, August 28, 2011

Weekend 1 complete

We have worked hard this week to get as much done as possible.  Becky, Bev and Larry came down to help both Saturday and Sunday.  Pictures will be coming soon.  We did a get a lot done though:

Clean:

  • Entire upstairs was cleaned from ceiling to floor, took the majority of Saturday to complete

Basement:

  • Completed ripping out the paneling, drywall, non-pressure treated furring strips secured with rusty nails, all lumber and Styrofoam insulation.
  • Removed old school carpet tack strips and pulled tacks from concrete.
  • Caulked cracks and nail holes with Drylok Crack Filler, sealed over with Quikrete 10lb Water Stop Hydraulic Cement
  • Removed sticky tiles in hall
  • Removed linoleum in laundry room
  • Installed new fancy dryer vent and sealed with spray foam insulation
Drywall:
  • Repaired nail holes and corner bead area in hall
  • Patched hole left by removing non-working doorbell
Paint:
  • Kitchen completely trimmed and painted a beautiful green color
  • Bedroom trimmed with the most amazing peach color imaginable
  • Bedroom ceiling painted and non-active water stains covered with Kilz Original
  • All trim was painted white
  • Baseboard and door trim was all taped in anticipation of painting with special custom grey paint
Outside:
  • Removed tree stump between fence post and foundation
  • Removed tree too close to house behind air conditioner
  • Cut tree which had grown through uninstalled A/C grate protector
  • Cut tree which had grown through fence
  • Cut tree which had grown around cable box and fence
  • Cut bushes grown through lattice on deck
  • Created a nice brush pile, I am sure the fire dept won't let me burn in the yard. BTW Chainsaws rule
  • Flower beds were weeded
Went to Lowe's at least 12 times, Walmart at least 4, and feed Shila approximately 42 pounds of crap which she is farting under the cover right now as she snores.  Shila is the most exhausted member of the crew!


Thursday, August 25, 2011

Two Days into Homeownership!


So yesterday, we signed our closing documents and became homeowners.  I immediately went to the house and broke in the back door.  I drilled out the locks and ended up destroying them to get the door open (don't ask why I had to destroy them).  I changed the locks to some nice new ones.


I then immediately started on demolishing the basement walls.  After day 1, I had removed approximately 8 foot of wall and furring strips.  Believe it or not the installer used roofing nails to install the furring strips.  One corner had a crack.

 
In order to stop a small leak around the shut off valve stem, I went to Lowes and got some graphite repacking and repacked the valve stem and it stopped leaking.  I did that! (felt a little proud).  Unfortunately the knob broke off and neither Lowes or Home Depot carry a replacement knob.

This ended DAY 1.  
After Kendal and I both got off work on Day 2, we went over to the house and got started.  Kendal swung a hammer and busted through the drywall.  We were able to remove the interior wall and found that behind it the ceiling and the post were FINISHED!!
We found some more moisture and some beautiful black ants behind the wall, further confirming that I made the right decision in taking out the walls to find out what was behind them!
At the end of Day 2, we had the walls out and just need to remove the wood on the concrete.


The fun continues tomorrow.